Road Marking Paint and Machine Manufacturer
+86-15668659958
Road Marking Paint and Machine Manufacturer
+86-15668659958
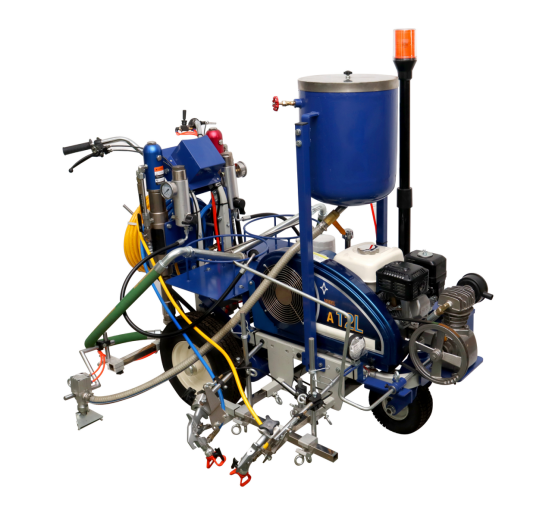
Product Parameter
| Engine | Honda GX200 |
| Width of marking road lines | 5-45cm |
| Number of spray guns | 2pcs |
| Plunger pump flow | 12L |
| Pressure regulator tube length | 15m |
| Glass bead box | 15L |
| Power | 6.5HP |
| Thickness of marking road lines | 0.2-1.0mm |
| Number of plunger pump for paints | 2pcs |
| Working pressure | 10-20mpa |
| Plunger pump | Daikin, Japan |
| Double glass beads dispenser | 5-45cm width adjustable |
| Machine equipped with | Filter, anti-blocking gun, flashing light, laser, pointer, lighting lamp |
| Glass beads dispenser | Pneumatic glass beads dispenser |
| Weight | 147kg |
| Over all size | 1550*760*1220mm |
Detailed instructions
When you receive the equipment, please install the spray gun properly. We will provide you with pictures or videos to guide the installation process.
Step 1: Prepare the materials, mix them thoroughly until the paint becomes very smooth. Add gasoline (we have tested the machine before leaving and the engine oil has been added).
Step 2: Please place the two buckets of paint (A and B) on the machine respectively. Insert the suction tube and the return tube into the bottom of each paint bucket (during the operation of the machine, the suction tube must not leave the liquid; otherwise, the sealing ring is prone to absorbing air, causing damage). Open the glass bead container, add an appropriate amount of glass beads, and then close the lid.
Step 3: After starting the gasoline engine and increasing the throttle, after the paint flows out from the two return pipes, the flow rate can be controlled by the valves on both sides of the plunger pump. After adjusting it properly, close the return valve and adjust the pressure using the knob on the hydraulic oil pump (with + and – signs for identification). Generally, we will have it adjusted during factory production.
Step 4: Adjust the position of the spray gun. First, fix the height of any one of the spray guns to achieve the desired width of the spray area, then adjust the position of the other spray gun to align with it. After alignment, fix the gun holder.
Step 5: Adjust the pressure of the oil-water separator. Gently pull the cap upwards and then turn the left and right knobs to adjust the pressure of the air tank. Generally, it should not exceed 0.2 megapascals. The greater the adjustment, the more glass beads will be scattered. After setting the pressure, open the air tank valve and send the air pressure into the glass bead tank. Keep the pressure gauge at the pressure you previously set until it reaches the pressure you previously set. Then, open the glass bead hose valve. At this point, the glass beads will enter the spreading device. Control the spreading device through the electromagnetic valve switch on the left hand side. (If the glass beads have been sprayed out, please close the valve from the oil-water separator to the glass bead tank, close the hose valve, open the exhaust valve of the glass bead tank, release the pressure completely, and then you can continue to add glass beads. After adding, operate as before.)
Step 6: After operating it, the spraying function should work properly.
Notes:
*When using, make sure not to mix the two paints together.
*When adding glass beads, be sure not to let them fall into the paint bucket (it’s best to find a cover to shield the paint bucket and then add the glass beads).
*After use, do not stay for too long. Please clean the pump body and pipeline with thinner promptly. Do it separately. Make sure to clean thoroughly. The process is the same as cleaning the paint.
*During the spraying process, it is best to keep an eye on how much paint is left in the paint bucket. The filter head of the suction pipe must not be exposed to the air; it must be fully immersed in the liquid (the same applies during cleaning).
*If you notice that the machine is not working properly, please promptly turn off the gasoline engine and contact the supplier.
Regarding maintenance
4. If the user finishes the construction work today, cleans the machine with the diluent, and then doesn’t use the machine for a long period of time afterwards, it is best to fill two buckets with water (add some detergent to the water) and clean the machine again until all the diluent is sprayed out. This will enable the machine to last longer.
Our company is a professional manufacturer of road hot-melt coatings and road glass beads. If you are interested, please feel free to contact me via email at any time export@toproadtraffic.com