Road Marking Paint and Machine Manufacturer
+86-15668659958
Road Marking Paint and Machine Manufacturer
+86-15668659958
Please read this operation manual before using the machine
And save it for future reference
SAFETY INSTRUCTION
Thanks for purchasing TOPROAD Cold Spray Machine for Road Marking Machine!
T The User Manual
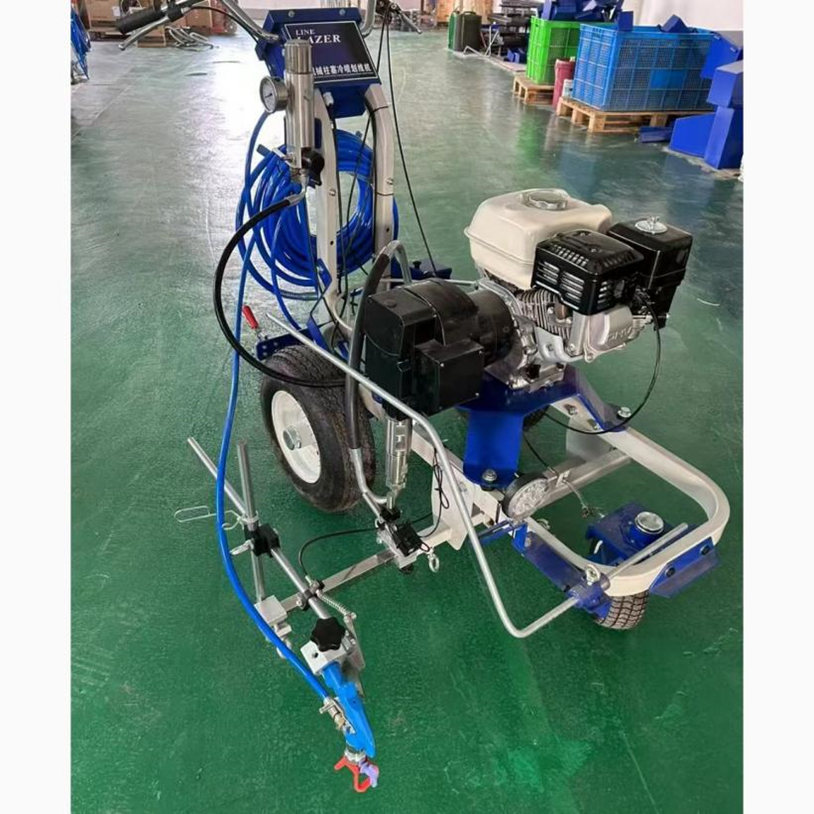
Technical parameters
Cold Paint Road Marking Machine is a special equipment for pavement marking that does not require heating paint and relies on an engine to drive a high-pressure plunger pump to form high-pressure airless spraying. Powered by gasoline, diesel or electricity, it pressurizes normal-temperature paints (water-based, oil-based, acrylic, etc.) and sprays them directly onto the road surface through a spray gun. It can quickly mark various traffic lines such as solid lines, dashed lines, zebra crossings, arrows and characters, and is widely used in roads, parking lots, airports, factories, residential areas and other scenarios.
| Engine: | GX200 |
| Power: | 6.5HP |
| Plunger pump: | Plunger pump |
| Spraying flow: | 6L |
| Working pressure: | 11-25mpa |
| Spray width: | 5-45cm |
| Filter: | 100 mesh filter |
| Lighting: | LED |
| Pointer: | Equipped with a laser ten scale ruler |
| High Pressure pipe length: | 15meter |
| Spray thickness: | 0.2-0.4mm |
| Overall dimensions: | 1550×760×960mm |
| Net weight: | 95KG |
| Equipped with braking function | |
Attention: Do not start the machine when it is empty. Before starting the machine, the suction pipe must be inserted into the liquid, otherwise the sealing ring may be damaged.
Maintenance and servicing of Honda gasoline engines
| Gasoline Engine Troubleshooting and Resolution | ||
| Fault | Cause | Solution |
| Gas engine is very difficult to pull | Hydraulic pressure is too high | Turn the hydraulic pressure knob counterclockwise to a low value. |
| The engine won’t start. | Engine switch is in the OFF position | Turn on the engine switch. |
| No fuel in the engine | Refill the gasoline tank (refer to the Honda engine user manual). | |
| Engine oil level is low | Attempt to start the engine. If necessary, add engine oil (refer to the Honda engine user manual). | |
| Spark plug cable is disconnected or damaged | Reconnect the spark plug cable or replace the spark plug. | |
| Cold engine | Use the choke. | |
| Fuel shut-off lever is in the OFF position. | Move the lever to the ON position | |
| Engine oil has entered the combustion chamber | Remove the spark plug, pull the starter rope 3–4 times to clear the oil, then replace the spark plug and start the engine. Keep the fuel injector upright to avoid fuel leakage. | |
| Inspection of the gasoline engine | ||
| Belt inspection | 1.Check whether the belt installation is correct. If the belt teeth are cracked or damaged, check whether the camshaft is stuck; if there are obvious cracks and damages on the belt surface, check whether the locking device of the belt tensioner is intact; if only one side is worn or damaged, check the positioning of the belt guide wheel and each belt pulley; if the belt teeth are significantly worn, check whether the belt inspection cover is damaged, whether the installation is correct, and whether there are foreign objects on the belt pulley teeth. If necessary, replace the belt. Under normal circumstances, the belt should be replaced every 150,000 km. | |
| 2.Do not bend, twist or flare the timing belt. Do not allow the timing belt to come into contact with oil, water or steam. When removing or installing the mounting bolts of the camshaft timing belt pulley, do not utilize the tension of the timing belt. | ||
| Oil Filter Replacement | Inspect and clean the mounting surface of the oil filter. | |
| Verify that the part number of the new oil filter matches the original. | ||
| Apply a thin layer of clean engine oil to the gasket of the new oil filter. | ||
| Hand-tighten the oil filter until the gasket contacts the base, then secure it in place. | ||
| Tighten an additional 3/4 turn using a dedicated service tool. | ||
| Replacement Interval: Normally replace every 100,000 km (or 12 months). Under severe operating conditions, replace every 50,000 km (or 6 months). Note: Intervals are for reference only. Replace according to actual usage conditions. | ||
| Spark Plug Replacement | Visually inspect the spark plug for electrode wear or damaged threads. Replace the spark plug if any abnormality is found. | |
| Carefully adjust the outer electrode to achieve the specified electrode gap: 0.8 mm. | ||
| Install the spark plug using a spark plug wrench and tighten it to the specified torque. | ||
| Maintenance Interval: Inspect every 100,000 km (or 12 months) under normal conditions. Replace every 200,000 km (or 24 months).Note: Intervals are for reference only. Determine the actual service time based on operating conditions. | ||
| Gasoline Engine Maintenance and Notes | ||
| Regularly check the engine oil for deterioration, water contamination, discoloration, or thinning. Replace the oil if its quality is compromised. | ||
| After the engine has been stopped for 5 minutes, check the oil level. If low, check for leaks and add oil. Do not overfill. | ||
| Drain all used engine oil and replace it with new oil. Perform this when the engine is warm to ensure complete drainage. If the oil pan contains heavy contaminants, flush it with a special protective fluid (never use gasoline or kerosene). Clean the filler neck before adding new oil to prevent contamination. Wait 5 minutes after filling before checking the oil level, then securely replace the filler cap. | ||
| Ensure the cooling system has sufficient clean, soft water for proper operation during operation. Check and replenish water before each use. Do not use hard water with high alkali or mineral content without treatment. | ||
| Normally, replace the engine oil every 5,000 km (or 6 months). Under severe operating conditions, replace it every 2,500 km (or 3 months). | ||
*During operation, adjustments and maintenance shall be carried out in accordance with the maintenance methods and specifications outlined in this manual.

Our company is a professional manufacturer of road melting kettles and road marking machines. If you are interested, please feel free to contact me via email at any time export@toproadtraffic.com


